Publish Docker Images to Repsy Using GitHub Actions

Repsy is a universal cloud-based package storage service for developers and teams. It supports different package formats like Docker, Maven, Gradle, npm, and PyPI.
Repsy Link:repsy.io
Today we will write a simple Java application, dockerize it, and deploy the Docker image to Repsy using GitHub Actions.
Our application is the broadcast-text-generator-app, which was written earlier in the Advanced Java and Applications II course I took from the C and System Programmers Association. In this application, subscriber servers register themselves to the server that produces random text using TCP and receive the random texts published over UDP. You can access the project using this link: broadcast-generator-app
You can see Dockerfiles in text-generator-server and text-request-server directories. Copy and paste the Dockerfile content below.
text-generator-server:
FROM eclipse-temurin:21-alpine

RUN addgroup text-generator-server && adduser --disabled-password --no-create-home --ingroup text-generator-server text-generator-server

USER text-generator-server

LABEL org.opencontainers.image.description="text-generator"

ADD target/text-generator-1.0.0-uber.jar backend.jar

EXPOSE 7001/udp

EXPOSE 6000/udp

ENTRYPOINT ["java", "-jar", "/backend.jar"]
text-request-server:
FROM eclipse-temurin:21-alpine

RUN addgroup text-request-server && adduser --disabled-password --no-create-home --ingroup text-request-server text-request-server

USER text-request-server

LABEL org.opencontainers.image.description="text-request-server"

ADD target/text-request-server-1.0.0-uber.jar backend.jar

EXPOSE 7000/tcp

ENTRYPOINT ["java", "-jar", "/backend.jar"]
Create Repsy Account and Deploy Token
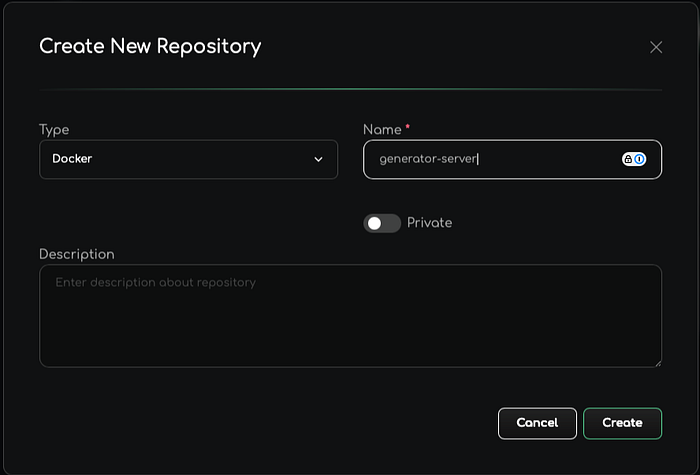
Visit repsy.io and create an account. After creating an account in Repsy, go to Repositories from the sidebar and click Create New Repository. Then create a Docker repository named generator-server.
Then open the repository and click Settings. In the Deploy Token section, click Create New Token. Fill in the required information and press Create to generate the deploy token.
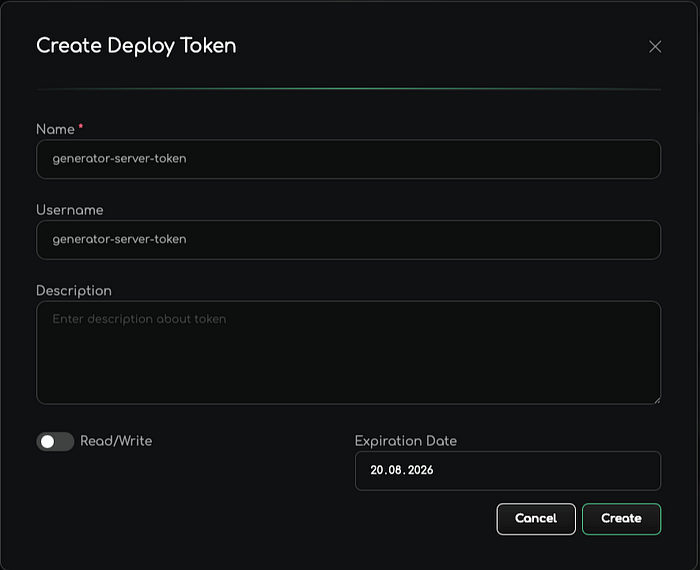
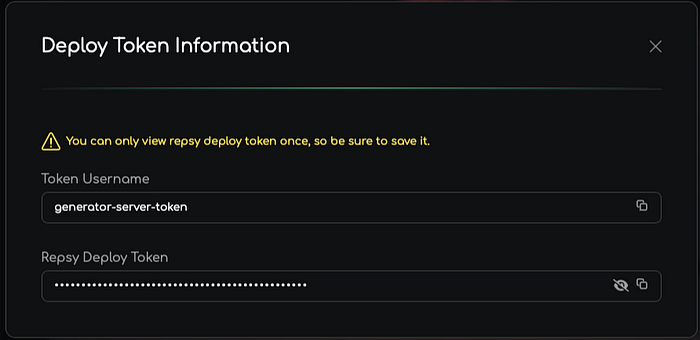
Save the created token information in a safe place. We will use this token soon in GitHub Actions.
Create GitHub Secrets, Configure Workflow, and Push Docker Image to Repsy in Pipeline
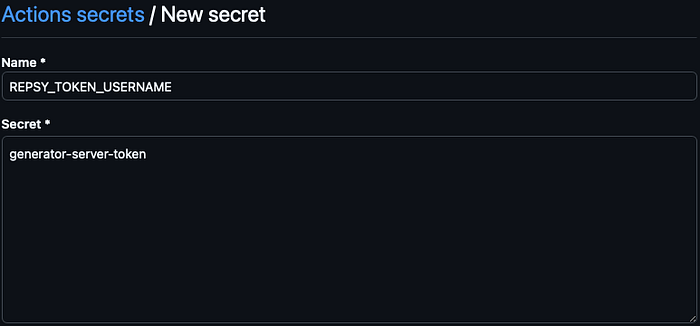
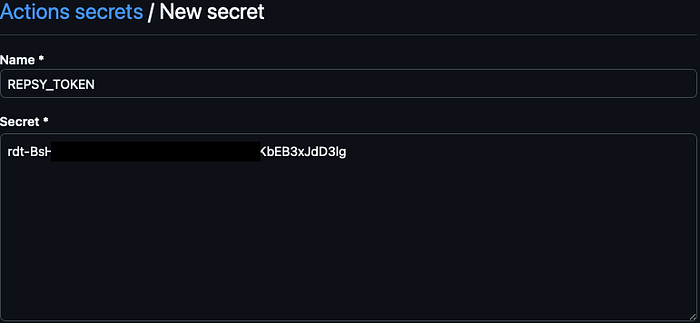
First, we create secrets in GitHub. Go to your repository >Settings>Secrets and variables (in the sidebar) >Actions. Then click the New repository secret button. After that, create the secrets as shown below:
Secondly, we need to create a workflow file in the base directory of the GitHub repository. Use this command to create it:
mkdir -p .github/workflows && touch .github/workflows/deploy-repsy.ymlAfter that, copy and paste the workflow content into this file.
name: Repsy Image Deployment

on:

 workflow_dispatch:

jobs:

 generator-server:

 runs-on: ubuntu-latest

 defaults:

 run:

 working-directory: ./text-generator

 steps:

 - name: Checkout

 uses: actions/checkout@v4

 - name: Set up JDK

 uses: actions/setup-java@v4

 with:

 java-version: "21"

 distribution: "temurin"

 cache: maven

 - name: Create jar files and run unit tests

 run: ./mvnw clean package -DskipTests

 - name: Set up Docker Buildx

 uses: docker/setup-buildx-action@v3

 - name: Log in to the Container registry

 uses: docker/login-[email protected]

 with:

 registry: repo.repsy.io

 username: ${{ secrets.REPSY_TOKEN_USERNAME }}

 password: ${{ secrets.REPSY_TOKEN }}

 - name: Detect Image Tag

 id: image-version

 run: |

 if [ "${{ github.ref_type }}" == "tag" ]; then

 DOCKER_IMAGE_TAG="${GITHUB_REF_NAME#v}"

 else

 DOCKER_IMAGE_TAG="`echo ${GITHUB_SHA::7}`"

 fi

 echo "DOCKER_IMAGE_TAG=$DOCKER_IMAGE_TAG" >> $GITHUB_ENV

 - name: Build and push generator-server

 uses: docker/build-push-[email protected]

 with:

 context: text-generator

 push: true

 tags: repo.repsy.io/nuricanozturk/generator-server/generator-server:${{ env.DOCKER_IMAGE_TAG }},repo.repsy.io/nuricanozturk/generator-server/generator-server:latest

 text-request-server:

 runs-on: ubuntu-latest

 defaults:

 run:

 working-directory: ./text-request-server

 steps:

 - name: Checkout

 uses: actions/checkout@v4

 - name: Set up JDK

 uses: actions/setup-java@v4

 with:

 java-version: "21"

 distribution: "temurin"

 cache: maven

 - name: Create jar files and run unit tests

 run: ./mvnw package -DskipTests

 - name: Set up Docker Buildx

 uses: docker/setup-buildx-action@v3

 - name: Log in to the Container registry

 uses: docker/login-[email protected]

 with:

 registry: repo.repsy.io

 username: ${{ secrets.REPSY_TOKEN_USERNAME }}

 password: ${{ secrets.REPSY_TOKEN }}

 - name: Detect Image Tag

 id: image-version

 run: |

 if [ "${{ github.ref_type }}" == "tag" ]; then

 DOCKER_IMAGE_TAG="${GITHUB_REF_NAME#v}"

 else

 DOCKER_IMAGE_TAG="`echo ${GITHUB_SHA::7}`"

 fi

 echo "DOCKER_IMAGE_TAG=$DOCKER_IMAGE_TAG" >> $GITHUB_ENV

 - name: Build and push text-request-server

 uses: docker/build-push-[email protected]

 with:

 context: text-request-server

 push: true

 tags: repo.repsy.io/nuricanozturk/generator-server/text-request-server:${{ env.DOCKER_IMAGE_TAG }},repo.repsy.io/nuricanozturk/generator-server/text-request-server:latest
Now you can trigger the action in your GitHub repository. If you want it to run when you push to the main branch, add the following:
on:
push:
branches:
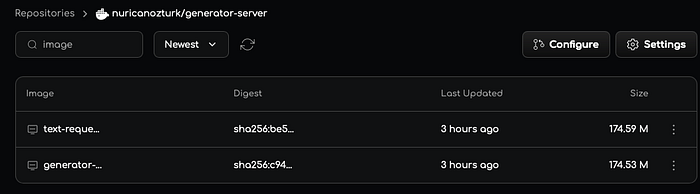
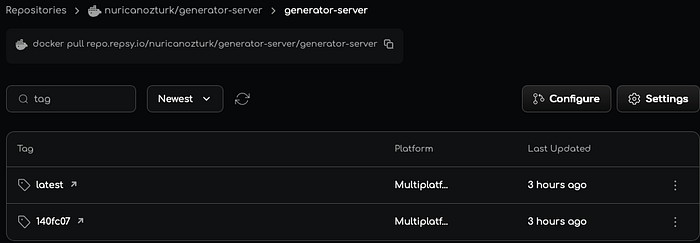
- mainAfter pushing, go to your repository in Repsy and check your images and tags.
Push and Pull Docker Images to Repsy Using Docker CLI
First, you need to login with Docker CLI. You can use your username and password or your deploy token.
Login with username and password
First, you need to login with Docker CLI. You can use your username and password or your deploy token.
docker login repo.repsy.io -u <username>Press Enter and type your password.
Login with deploy token
docker login repo.repsy.io -u <username>Press Enter and type your deploy token.
Build Docker Image
Go to the folder where your Dockerfile is and build the image:
docker build -t repo.repsy.io/<username>/<registryName>/<imageName>:<imageTag> .If you want to build for multiple platforms and push at the same time, use:
docker buildx build --platform linux/amd64,linux/arm64 -t repo.repsy.io/<owner>/<repo_name>/<image>:<tag> --push .- Note: When you use
--push, the image is built and pushed at the same time. You don’t need to rundocker pushseparately.
Push Docker Image
If you built normally, push the image with:
docker push repo.repsy.io/<username>/<registryName>/<imageName>:<imageTag>Pull Docker Image
To download an image from the registry:
docker pull repo.repsy.io/<username>/<registryName>/<imageName>:<imageTag>- For more information, you can visit the Repsy documentation.
Conclusion
Using these steps, you can publish your Docker images to Repsy with CLI. The process is simple: login, build, and push. Repsy works well with GitHub Actions too, so you can also set up automation later.
This way, you can manage and share your Docker images easily.